Why would you need Preview Environments? Link to heading
Trunk-based development (we will refer to it as TBD) has been gaining significant popularity in modern, agile oriented organisations. Triggering my curiosity I decided to look into why this is trending. Here are a couple of reasons I found:
- Alignment with DevOps Practices - Developers continuously merge small, incremental changes into the trunk (main branch), enabling faster and more frequent deployments. This aligns perfectly with the DevOps principal of delivering value to customers quickly and iterating frequently.
- Simplified Merge and Conflict Resolution - By minimising long-lived feature branches, TBD avoids large merge conflicts, which are common in other branching strategies (ex. GitFlow), resulting with improved development experience and reduced headaches.
- High Adaptation by Leading Tech Companies - The tech giants like Google, Meta, and Netflix are known for using TBD because of the scalability and speed it offers, so naturally, other companies are following their lead.
While TBD might sound like a great idea since we all love speed, you need to keep in mind that in order for it to work efficiently it requires an environment where automation and continuous testing are mature, allowing teams to keep the main branch stable. Without this, TBD will lead to instability in the codebase.
With this in mind, let’s begin designing our flow. We start by adding unit tests and static code analysis to run when a new pull request is opened. While this is a great first step, we are missing things like manual and automation testing of features, integration testing of API endpoints or database migrations, and even some performance testing. All of these tests require the code to be deployed on an environment. In a branching strategy like GitFlow we would have a dev environment that would correlate to a dev branch. But in TBD we don’t have these branches, so how do we test our code?
This is where Preview Environments come into play. They are a great way to test your code in isolation before merging it into the main branch. Being scaled down production like environments that are created on demand with every open pull request, they allow developers to test their code in a “real-world scenario”. This is a great way to catch bugs early and ensure that the code is working as expected.
How do Preview Environments work in Kubernetes? Link to heading
Now that we know the purpose of Preview Environments, let’s look into how we can achieve this in Kubernetes.
Tooling pre-requisites Link to heading
Before we dive into the specifics, you will need to have the following things already configured:
- GitHub Account - where the code and configuration will be located.
- Have a repository with a containerised application of some sort, and helm chart created for its deployment on k8s.
- Kubernetes - where we will deploy.
- Kubernetes enabled on Docker Desktop or any other variant will work.
- Argo CD - to manage the deployments.
- A basic fresh install should be enough.
- Your GitHub repository added to the Argo CD Repository connections.
ArgoCD has a feature called Application Set, which has different types of generators for different use cases. We are going to be using the Pull Request Generator that will monitor the repository of our application.
Setup pre-requisites Link to heading
In GitHub create a Personal Access Token with the following permissions:
reporead:packages
Setup kubernetes-reflector in your cluster. This will allow us to automatically create the secrets in the namespaces where the preview environments will be created.
For the most basic installation you can run the following command:
kubectl apply -f https://github.com/emberstack/kubernetes-reflector/releases/latest/download/reflector.yaml
Then we need to setup the following Kubernetes secrets:
GitHub token - this will be used by the ArgoCD Application Set to monitor the private repository for pull requests and update the deployments accordingly. Here is a simple way to create the secret:
- Base 64 encode your PAT token:
echo -n 'YOUR GH PAT TOKEN' | base64- Create the secret:
apiVersion: v1
data:
  token: <YOUR_BASE64_GITHUB_TOKEN>
kind: Secret
metadata:
  name: github-token
  namespace: argocd
GitHub container registry credentials - If you are using a private container registry, you will need to create a secret with the credentials. If you are using a public registry you can skip this step. Here is a simple example on how this would be done for GitHub Container Registry:
- Create the secret:
kubectl create secret docker-registry github-cr-creds -n argocd --docker-server=ghcr.io --docker-username=<YOUR_GH_USERNAME> --docker-password=<THE_PAT_WE_CREATED> --docker-email=<YOUR_GH_EMAIL>- Add the following annotations to the github-cr-creds secret so that it will automatically be created on each new namespace:
annotations:
  reflector.v1.k8s.emberstack.com/reflection-allowed: "true"
  reflector.v1.k8s.emberstack.com/reflection-auto-enabled: "true"
Note: Keep in mind we are not following security best practices. This is purely for demo purposes.
Create an Application Set Link to heading
Now that we have all the pre-requisites in place, we can create the Application Set. You can read more about the configuration options here. Here is a basic example of how this can be done:
apiVersion: argoproj.io/v1alpha1
kind: ApplicationSet
metadata:
  name: preview-environments
  namespace: argocd
spec:
  generators:
    - pullRequest:
        github:
          owner: <YOUR_GITHUB_USERNAME or ORGANIZATION>
          repo: <YOUR_REPOSITORY>
          labels:
            - preview
          tokenRef:
            name: github-token
            key: token
        requeueAfterSeconds: 60
  template:
    metadata:
      name: "webapp-{{branch}}-{{number}}"
      namespace: argocd
    spec:
      project: default
      source:
        repoURL: "https://github/<YOUR_GITHUB_USERNAME or ORGANIZATION>/<YOUR_REPOSITORY>.git"
        targetRevision: "{{head_sha}}"
        path: helm
      destination:
        server: https://kubernetes.default.svc
        namespace: "webapp-{{branch}}-{{number}}"
      syncPolicy:
        syncOptions:
          - CreateNamespace=true
        automated:
          prune: true
          selfHeal: true
Setting up the GitHub Actions Link to heading
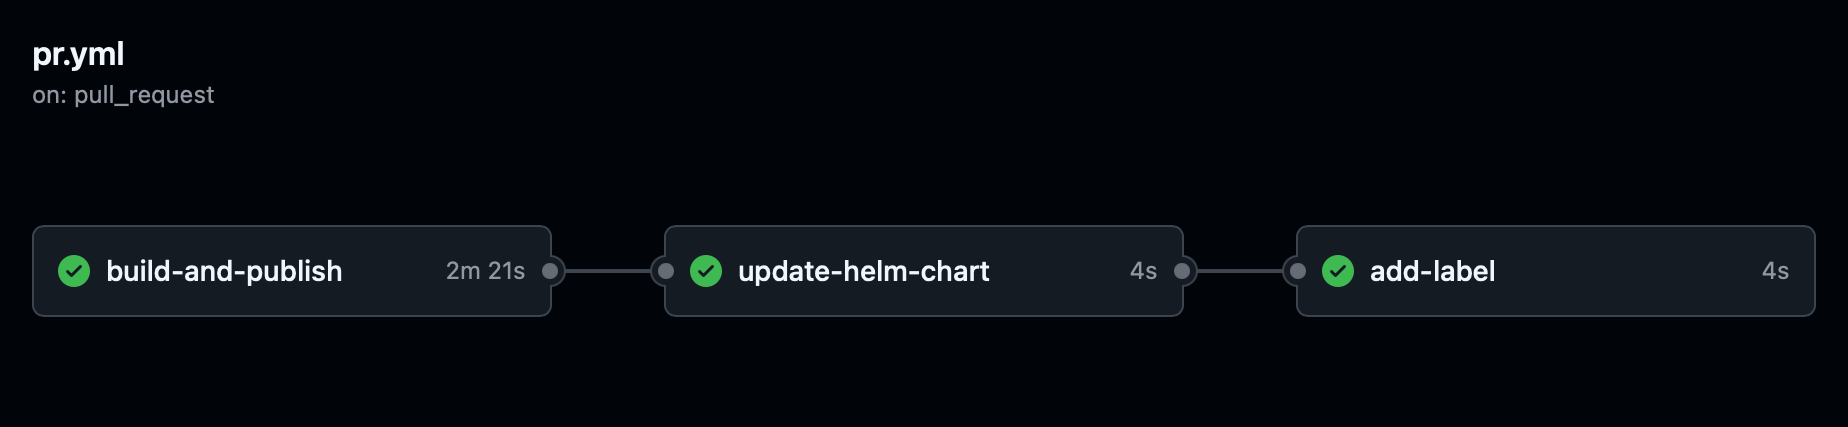
We need to create a GitHub Action that will get triggered on a PR event and do the following:
- Build and publish the container image.
- Update the helm chart values with the new image tag (on the PR branch).
- Add the label
previewas a PR label so that the Application Set can pick it up.
Note: Make sure to create a GitHub Secret with the name GH_TOKEN and the value of the PAT token we created earlier. This will be used to clone the repository and make the changes to the helm chart values, so make sure the secret has the required permissions to do so.
Here is a basic example of how this can be done:
name: PR

on:
  pull_request:
    branches:
      - main

permissions:
  packages: write # Required for publishing the container image
  contents: write # Required for updating the helm chart values
  pull-requests: write # Required for adding the label

jobs:
  build-and-publish:
    runs-on: ubuntu-latest
    steps:
      - name: Checkout
        uses: actions/checkout@v4

      - name: Login to GitHub Container Registry
        uses: docker/login-action@v3
        with:
          registry: ghcr.io
          username: ${{ github.actor }}
          password: ${{ secrets.GITHUB_TOKEN }}

      - name: Build and Push
        uses: docker/build-push-action@v6
        with:
          context: .
          push: true
          file: ./Dockerfile
          tags: ghcr.io/<username or organization>/<repository>:${{ github.event.pull_request.head.sha }}
          platforms: linux/amd64

  update-helm-chart:
    runs-on: ubuntu-latest
    needs: build-and-publish
    steps:
      - name: Checkout
        uses: actions/checkout@v4

      - run: |
          echo "Set Git credentials"
          git config --global user.email "actions@github.com" && git config --global user.name actions-bot
          echo "Clone the repository"
          git clone https://oauth2:${{ secrets.GH_TOKEN }}@github.com/${{ github.repository_owner }}/<repository>.git
          cd <repository>
          echo "Checkout the PR branch"
          git checkout ${{ github.event.pull_request.head.ref }}
          echo "Update the helm chart values"
          sed -i "s,tag:.*,tag:\ ${{ github.event.pull_request.head.sha }}," helm/values.yaml
          echo "Commit the changes and push"
          git add . && git commit -m "Update helm chart values [skip ci]" && git push

  add-label:
    runs-on: ubuntu-latest
    needs: update-helm-chart
    steps:
      - name: Checkout
        uses: actions/checkout@v4

      - uses: actions-ecosystem/action-add-labels@v1
        with:
          labels: |
            preview
Testing the setup Link to heading
Once you have everything in place, you can open a PR in your repository.
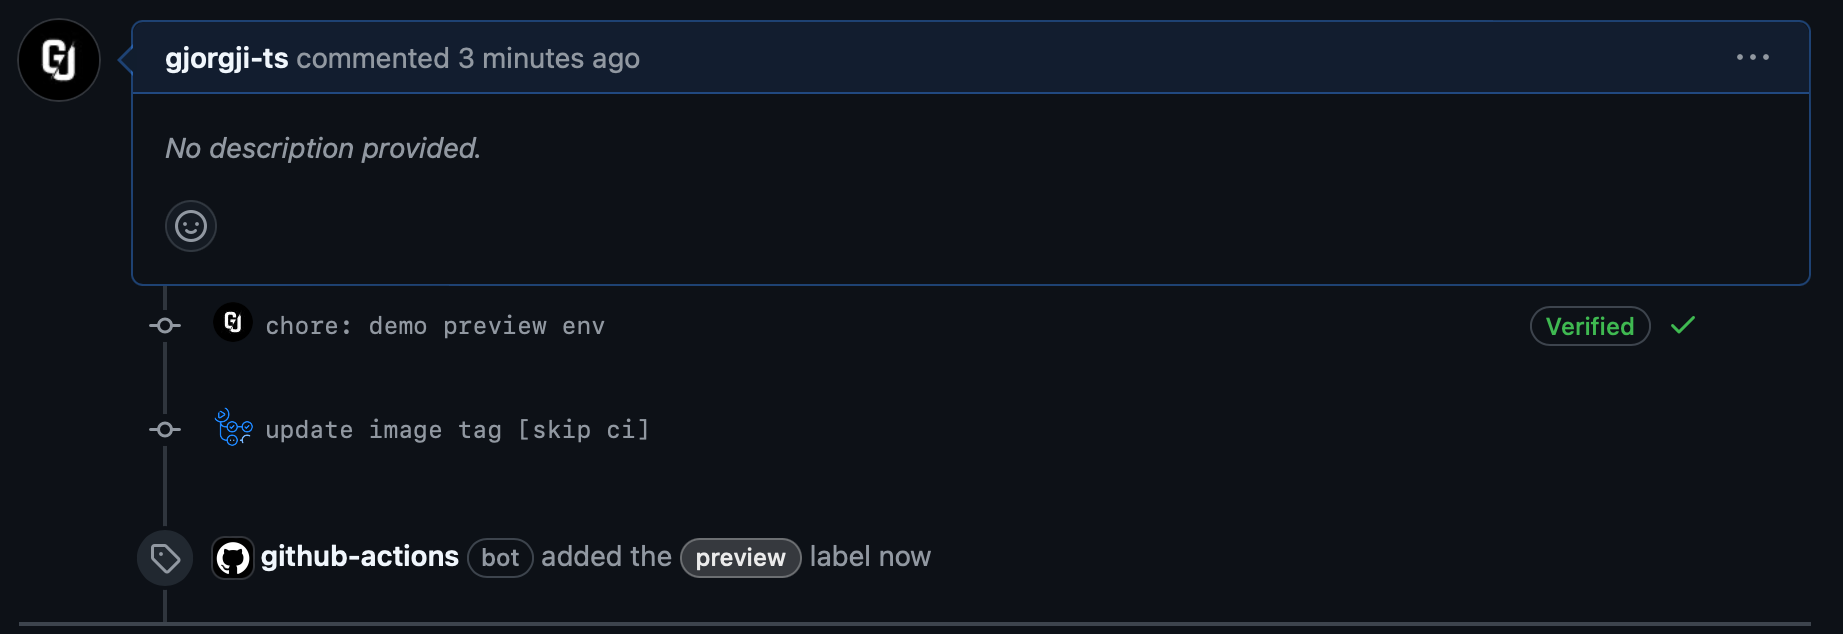
This will trigger the GitHub Action, which will build and publish the container image, update the helm chart values, and add the preview label to the PR.
The Application Set will pick up the PR and create a new namespace with the deployment of your application.

By following the steps above you should have a working on demand Preview Environment setup in Kubernetes. This will allow you to test your changes in an isolated environment before merging them into the main branch. Keep in mind that this is a basic setup for demo purposes and should be adjusted to fit your specific needs. Have fun building! 🚀